Friday, June 24, 2011

How to Move a Large Granite Block (and install a free step)

When we bought this house the steps were a mix of large uneven stones which caused you to step up higher than you normally would and they looked like this:

We knew we had some larger pieces of Granite on site which were sort of symmetrical and decided we could use one of them to make a new step for free. The challenge was how do you move it from where it is to where you want it when you don’t have a bucket loader or backhoe? The answer is you need the following tools:

A big heavy duty crowbar (5 feet long and 18 pounds in weight)

Assorted rocks and blocks

A heavy duty wire cable with a hook on each end

Three steel pipes (all the same diameter is best)

Long wood planks

An Automobile

A cold beer

* I just need to mention here under the Principle that Desire Moves that I did not have the steel pipes I needed, but I KNEW that I could get them for free somehow. Sure enough my Mind’s Eye led me to the pipes I needed at the dump just one day before this project. There they were, just waiting for me in perfect condition and with no cutting required.


First assemble all the tools (excluding the beer) near the piece of granite. For those who have not had much experience using leverage you will learn fast. The longer your lever (crowbar) the easier you can lift heavy objects. Place a smaller stone or block about 4 to 5 inches high very close to the piece of granite and then put your crowbar between them getting the tip of the bar under the granite and then pull or push down on the smaller rock which is known as the fulcrum. Sorry if I’m sounding too technical here for such as Caveman job but I want to help educate fellow Cavemen and women when possible.


Once you get one end of the granite lifted have a helper (carefully) put some blocks under it and then wrap your cable around the granite and hook the other end to your car. If you have a trailer hitch good if not, attach it to the frame under the car. Next, lay one end of a wood plank under the granite and as the driver “very very slowly” moves forward, put the pipe pieces under the block of granite which will now roll along with such ease that you’ll feel like building a pyramid for your next project. As the last pipe rolls out the back of the granite block return it to the front. Turn the planks and the pipes in the direction you want it to go and with a little pushing or pulling she’ll make it to the destination. Our granite block was only 30 feet away from our step but we did have a small incline to get it over initially. It took Lauren and me less than 2 hours to complete the task start to finish and now we have a nice granite step for free. Oh yes, now it’s time for the beer.


Thursday, June 16, 2011

Mellow Yellow

I took this photo with my phone camera. It's beauty for the eyes and a pleasure to have on a morning walk.

Sunday, June 5, 2011

How to Un-Plug your Basement Drain Pipe – with a little effort

The lowest feature of our dear old house is the clay pipe drain in the basement which takes the water that runs through it and guides it approximately 50 feet long and 5 feet underground to empty into the roadside ditch by our driveway. The problem was that about a week ago this pipe clogged with silt and dirt to the point where it no longer drained. This meant our basement was turning into an in ground swimming pool or if we were so inclined; a Koi fish pond. The only solution that I could think of was one of those Power Snake Augers which I would have to rent but there is no place close to here that rents them. To make a long story shorter, Lauren ended up speaking to Robbie at the Bethel Sewer Department who said “I’ll be right over”. This is just one of the many things I love about small town living; a live person on the phone who says he’ll be right over. So Robbie and Randy came right over and plunked the solution into my hand which looks like this:


I’m still not sure what it is called but it works wonders. You put it on the end of your garden hose, insert it as far as you can into the drain pipe and then turn on the water. After a minute you stop the water flow (which deflates the rubber diaphragm) pull it back a foot, then push it in again as far as you can, and then turn on the water again. You repeat this process until you get to the end of the drain pipe. (Tip: Kink your garden hose by hand to stop the water flow if your shut off valve is far away). This cleaned the pipe out better than it was when I bought the home. I also dug out the other end of the pipe area and the ditch at the roadside to keep it open and flowing downhill.

In addition I cleaned out about 30 gallons of sand/dirt/muck from inside the basement which was all great exercise as I hauled it up the stairs and to the back yard. Finally I have to give credit to Lauren for getting the connection to Robbie at the sewer department who let me borrow this very useful tool.


Thursday, May 26, 2011

Hydrangeas, the Fire Pit, and other things popping up in the yard

In my attempt to begin landscaping and in order to have less lawn to mow I planted this pink Hydrangea bush in the yard. Lauren cannot understand why I decided to plant it where I did and I’ve accepted the fact that this is just one of those things which we’ll never agree on. I did give it a lot of thought however. On my late evening walks out to the yard with Dusty I surveyed all the possible locations for it prior to planting. I thought of how it would look from different viewpoints around the yard and from within the house. You can easily see it from inside the house looking out the kitchen window, the bathroom window, and the living room window. I would like to plant two more of them by the stone wall but right now this is still designated as my bamboo killing zone and I’m afraid anything I plant in this area would suffer.

This year we’ve decided to make our fire pit fancy. Instead of having just the exposed truck tire rim in the yard we bought some concrete blocks to put around it. These blocks are better designed for retaining walls than the tight radius of the fire pit but for now they’ll do. I would like to mortar some permanent rocks around the pit but we have to keep the pit mobile at this current location. This is because before the snow flies it has to be moved so that our snowplow guy can begin pushing the early snows as far back in the yard as he can. But I shouldn’t be talking about snow right now…Memorial Day is Monday.


Let’s talk about summer and things popping up in the yard. Besides dandelions growing in the yard we’re beginning to see our first crop of golf balls compliments of the golfers across the street. The first ball of the season I’m saving for Eva because it matches a tattoo she has. Go Red Sox! Ahhh…the beginning of summer…this is what we’ve been waiting for New England….so clean off your grills….open the windows….slap those mosquitoes and Enjoy!

Monday, May 9, 2011

Fiddleheads and The Last Two Feet of Snow


On Friday our good neighbor Pease brought us over a bag of fiddleheads he had picked that day. They made a great veggie dish to go with the delicious soup Lauren had created Saturday night. Fiddleheads are another sure sign of Spring and as I was surveying the back yard this morning with Dusty I admired the last two feet of snow. There’s a warm breeze blowing today and my guess is that by 8:00 AM tomorrow that snow will be history.


So good-bye snow

You’ve been nice to know

Bringing pleasure to the skiers

Aiding the economic flow

See you next season

When the cold winds blow

Tuesday, May 3, 2011

Cooking with Gas


Amber and Tommie bought us a very nice Anniversary/Birthday gift in the form of an Amana gas cook stove. What a pleasure it is…not that I do the cooking, but it is just nice to see Lauren using a real cook stove instead of what she referred to as the “Easy-bake” oven she’s been working with for the last year.

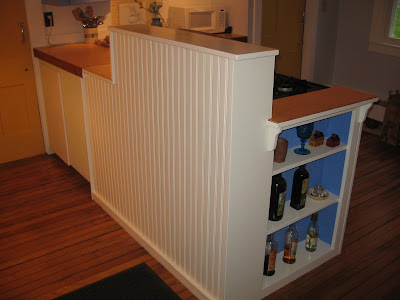
Once the realization set in that we were not going to be able to “remodel the whole kitchen” worthy of a photo shoot in Better Homes and Gardens we’ve begun to make the kitchen “workable” and this cook stove takes it to a new level. It’s a funky kitchen to be sure but with this new addition it seems…well, wicked nice. Thanks Amber and Tommie.


Tommie helped me get the stove surround started. Our buddy Dennis from Community Energy installed the gas line and got the stove working. A few weekends later we have a finished product. What’s really nice about this design is that I can stand on the back side of the stove and very comfortably rest my arms on that shelf and watch Lauren cook. I used 2” x 6” framing for the surround which allowed for the built in shelving you see in the photos. Do you like the two little shelf brackets near the top? I thought it needed this finishing touch so I drew and cut them out on a piece of pine. The bead board wainscoting on the back side is actually solid pine tongue and groove plank paneling. The pieces are about 3 ½” wide but they are only ¼” thick. I had a plywood backing behind it to add strength and stability to the half wall so I just nailed the bead board to the plywood but if you’re going against sheetrock you will want to use something like “Liquid Nails” to install it. The plank paneling is easy to work with but because it is so thin you may find that at some of the knots you have a see-through hole. Because we were painting this I just filled the few holes with latex caulking but if you were going to stain or clear finish it you would want to use wood putty.


Leave a comment telling me what you would love to see Lauren cooking on the stove when you come for a visit. I’ll be providing the wine and a cheese ball.


Tuesday, April 12, 2011

TURBULENT WATER

Most of our friends and family know by now that on March 17th Lauren had her left kidney removed after a trip to the emergency room and a CT scan showed a tumor growth in the kidney. The bad news was it was cancerous but the good news is it appears that it was limited just to the kidney. All the lymph nodes around it came back negative. A follow up visit we had with an oncologist last Friday was good. No further treatment such as chemotherapy was recommended, just follow up CT scans in the months to come to see if there have been any changes.

This was turbulent water that we had not expected and like many unexpected things it was scary. Would everything be okay once the kidney was removed? Three weeks later and looking back it seems so far, so good. We were both impressed by the quality of care, the professionalism, and the kindness Lauren received from the nurses and doctors at Stephen’s Memorial Hospital in Norway and at Maine Medical Center in Portland.

Family and friends rallied around us although it happened so fast we didn’t have a chance to get the word out to everyone. It turned out to be another family event however and some were able to visit while Lauren was recovering at the hospital. I know this pleased her a lot and made the healing process all the more easier. Lauren is doing great right now. Thanks to everyone for your love and support.

Peter